Pineapple Towel Holder

I used the following 2 patterns as the basis for my pattern:
Towel Hanger
and
Pineapple Motif
What You’ll Need:
Size H/8 Crochet Hook
Worsted weight cotton yarn
Button to fit hole
Yarn needle for weaving in ends
You’ll Need To Know:
Slip Stitch
SC (Single Crochet – US)
HDC (Half Double Crochet – US)
Magic Ring
Magic ring, Ch 2, HDC 30 in the ring (You may want to do 40 if you plan to use this for fluffier towels like bathroom hand towels.) Join with a slip stitch. Ch 2, turn.
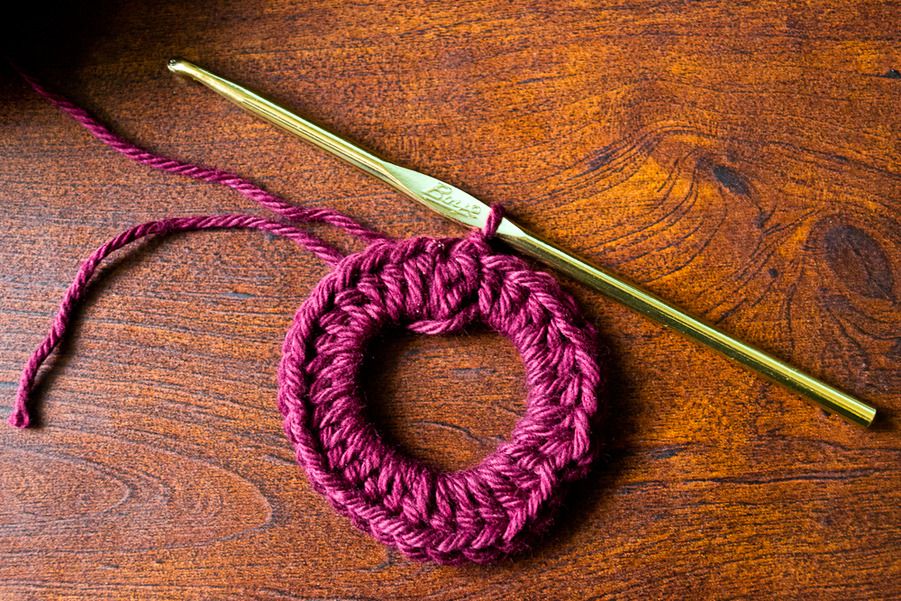
HDC in the same stitch, and the next 7. Ch 2. Turn. (Each row will have 8 HDC and 1 turning chain of 2 stitches.)
HDC 17 rows. Turn.
Now we'll start the pineapple.
If you prefer to work from a chart, click on the link for the Pineapple motif. The scarf pattern will come up and there is a chart. Pineapple Motif Start on row 2 except instead of slipping 3 stitches and working in a ch1 sp, you will sl st in 1st stitch, ch 3, (2 dc, ch 1, 2 dc), ch 2, (2 dc, ch 1, 2 dc) in the next 5th ch, turn. Then follow the chart for rows 2-15. Don't follow the chart for row 16. Instead chain 9, slip stitch into 3rd chain to make picot, chain 3 more, connect with slip stitch in last double crochet. Close-up photo of picot point below.
Written instructions for those who don't like charts
Row 1(RS): sl st in 1st stitch, ch 3, (2 dc, ch 1, 2 dc), ch 2, (2 dc, ch 1, 2 dc) in the next 5th ch, turn.
Row 2: sl st in the first st, (ch 3, dc, ch 1, 2 dc)
in first ch-1 sp, ch 2, (2 dc, ch 1, 2 dc) in next ch-1 sp,
turn.
Row 3: sl st in each of first 3 sts, (ch 3, dc, ch 1, 2 dc) in
first ch-1 sp, (dc, ch 1, dc) in next ch-2 sp, (2 dc, ch 1,
2 dc) in next ch-1 sp, turn.
Row 4: sl st in each of first 3 sts, (ch 3, dc, ch 1, 2 dc) in
first ch-1 sp, (2 dc, ch 1, 2 dc) in next ch-1 sp, (2 dc,
ch 1, 2 dc) in next ch-1 sp, turn.
Row 5: sl st in each of first 3 sts, (ch 3, dc, ch 1, 2 dc) in
first ch-1 sp, ch 2, 9 dc in next ch-1 sp, ch 2, (2 dc, ch 1,
2 dc) in next ch-1 sp, turn.
Row 6: sl st in each of first 3 sts, (ch 3, dc, ch 1, 2 dc) in
first ch-1 sp, ch 1, sk ch-2 sp, dc in first dc, *ch 1, dc in
next dc* rep from * to * 7 more times, ch 1, (2 dc, ch 1,
2 dc) in next ch-1 sp, turn.
Row 7: sl st in each of first 3 sts, (ch 3, dc, ch 1, 2 dc)
in first ch-1 sp, ch 3, sk next ch-1 sp, (sc in next ch-1 sp,
ch 3) 8 times, (2 dc, ch 1, 2 dc) in next ch-1 sp, turn = 9
ch-3 sps.
Row 8: sl st in each of first 3 sts, (ch 3, dc, ch 1, 2 dc) in
first ch-1 sp, ch 3, (sc in next ch-3 sp, ch 3) 7 times, (2
dc, ch 1, 2 dc) in next ch-1 sp, turn = 8 ch-3 sps.
Row 9: sl st in each of first 3 sts, (ch 3, dc, ch 1, 2 dc) in
first ch-1 sp, ch 3, (sc in next ch-3 sp, ch 3) 6 times, (2
dc, ch 1, 2 dc) in next ch-1 sp, turn = 7 ch-3 sps.
Row 10: sl st in each of first 3 sts, (ch 3, dc, ch 1, 2 dc)
in first ch-1 sp, ch 3, (sc in next ch-3 sp, ch 3) 5 times,
(2 dc, ch 1, 2 dc) in next ch-1 sp, turn = 6 ch-3 sps.
Row 11: sl st in each of first 3 sts, (ch 3, dc, ch 1, 2 dc)
in first ch-1 sp, ch 3, (sc in next ch-3 sp, ch 3) 4 times,
(2 dc, ch 1, 2 dc) in next ch-1 sp, turn = 5 ch-3 sps.
Row 12: sl st in each of first 3 sts, (ch 3, dc, ch 1, 2 dc)
in first ch-1 sp, ch 3, (sc in next ch-3 sp, ch 3) 3 times,
(2 dc, ch 1, 2 dc) in next ch-1 sp, turn = 4 ch-3 sps.
Row 13: sl st in each of first 3 sts, (ch 3, dc, ch 1, 2 dc)
in first ch-1 sp, ch 3, (sc in next ch-3 sp, ch 3) 2 times,
(2 dc, ch 1, 2 dc) in next ch-1 sp, turn = 3 ch-3 sps.
Row 14: sl st in each of first 3 sts, (ch 3, dc, ch 1, 2 dc)
in first ch-1 sp, ch 3, sc in next ch-3 sp, ch 3, (2 dc,
ch 1, 2 dc) in next ch-1 sp, turn = 2 ch-3 sps.
Row 15: sl st in each of first 3 sts, (ch 3, dc, ch 1, 2 dc)
in first ch-1 sp, (2 dc, ch 1, 2 dc) in next ch-1 sp, turn.
Row 16 (picot point): Chain 9, slip stitch into 3rd chain to make picot, chain 3 more, connect with slip stitch to last double crochet.
 Picot point close-up
Finish by making what I call a slip stitch knot. Make a slip stitch but before you finish it cut the yarn leaving about 6 inches, pull tail all the way through the loop. Pull on the tail to secure. Weave ends in well so that they don't come out.
 towel from the back
Fold over (backward) between rows 10 and 11 so that the wrong side is facing itself. Pick a button that's slightly larger than the large top triangle. This large triangle is your button hole. Sew the button on. Slip your kitchen or hand towel into the ring so that it's folded in half, and you're done! Congratulate yourself on your talent!
 back view without towel
  Here the towel isn't secured to a hanging rod. In this picture the pineapple needs to be folded down and buttoned.
Pick a solid colored towel in a contrasting color (this works best to show off your stitch pattern), fold it in thirds the long way, slip through the loop so the loop is about in the middle of the towel length, and hang it where you want it.
No comments:
Post a Comment